Introduction
In today’s fast-paced digital world, full-stack development has become one of the most in-demand skills. Companies are no longer satisfied with just theoretical knowledge—they seek developers who can build complete, real-world applications from start to finish.
Whether you are a beginner or preparing for a job, building a full-stack project is the best way to enhance your skills and demonstrate your expertise. It helps you understand how the frontend, backend, and database work together in a real system.
In this guide, you’ll learn step-by-step how to build a full-stack project in a simple and practical way.
What is a Full Stack Project?

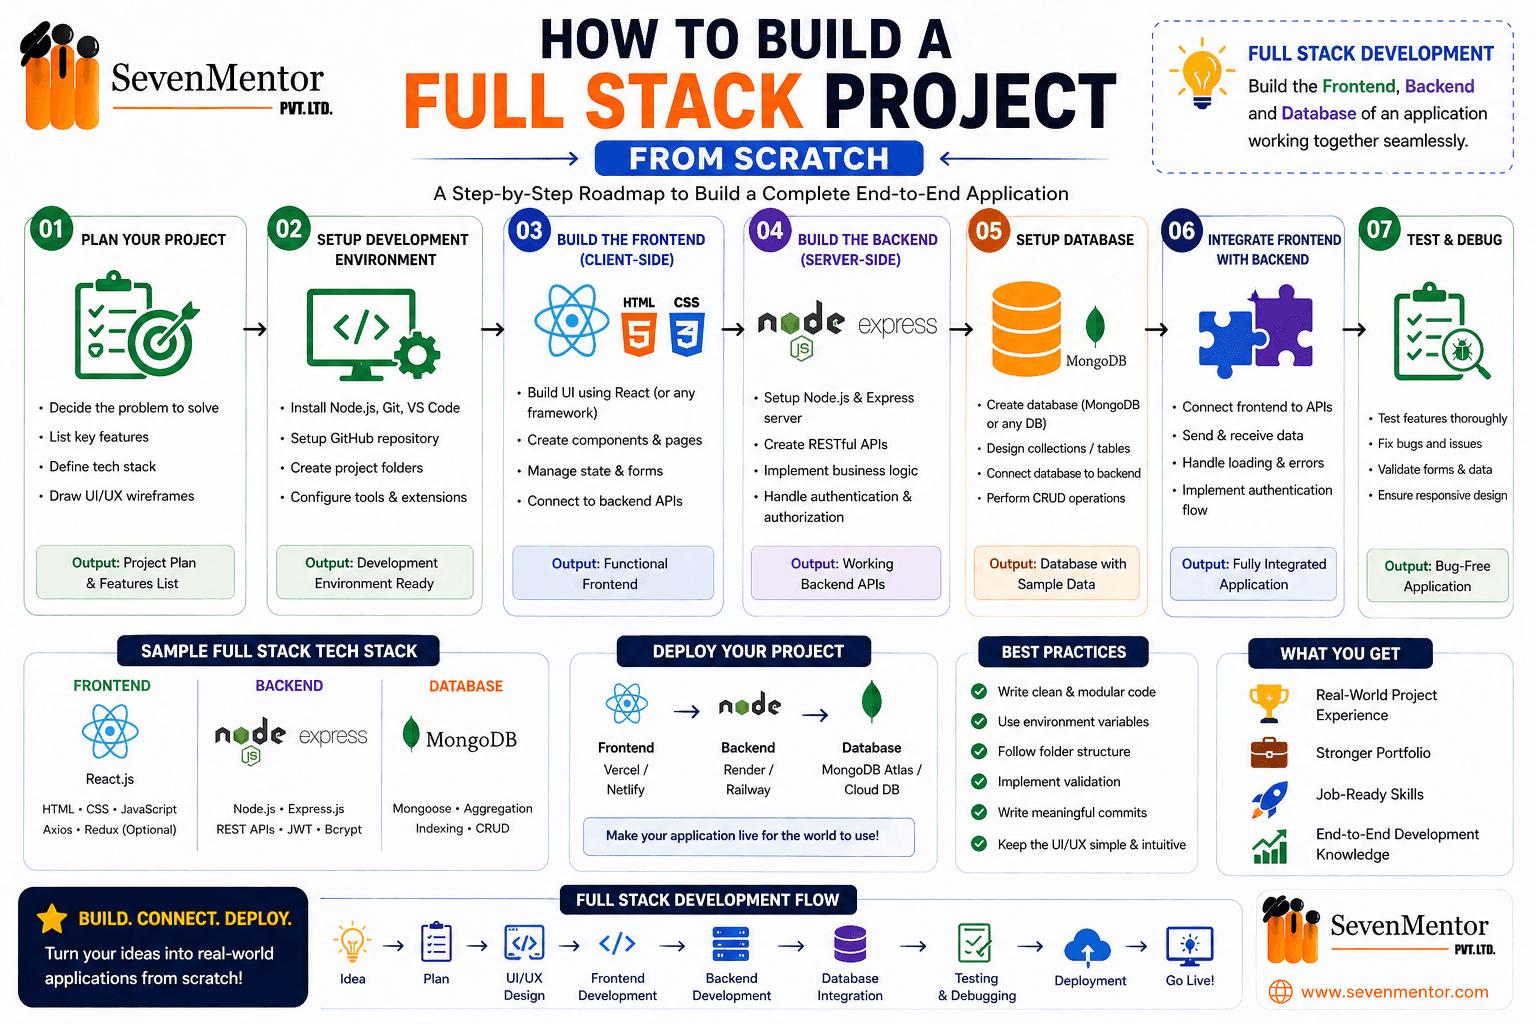
A full-stack project is an application where you work on all three layers:
- Frontend (UI): What users see and interact with
- Backend (Server): Handles logic and processing
- Database: Stores and manages data
Example Flow:
When a user fills out a form →
Data goes to the backend →
Backend saves it in the database →
Frontend displays a response
Step 1: Choose a Project Idea
The first and most important step is selecting a meaningful project idea. Choose something that solves a real-world problem instead of copying basic projects.
Example Ideas:
- Student Management System
- Library Management System
- Job Portal
- Online Course Platform
💡 Tip: Choose a project you can confidently explain during interviews.
Step 2: Select Your Tech Stack
Your tech stack defines the tools and technologies used to build your project.
Frontend Technologies:
Backend Technologies:
- Spring Boot (Java)
- Node.js
Database Options:
- MySQL
- PostgreSQL
Recommended Combination:
Angular + Spring Boot + MySQL
This stack is powerful and widely used in the industry.
Step 3: Plan Your Project
Planning is essential before writing any code.
Ask Yourself:
- What features will the project have?
- What pages are required?
- What data will be stored?
Example Features:
- User Registration
- Login System
- Dashboard
- Form Submission
Example Pages:
- Home Page
- Login Page
- Dashboard
- Form Page
💡 Tip: Create a simple diagram or outline before coding.
Step 4: Start Backend Development
The backend acts as the brain of your application.
Steps:
Create a Spring Boot project
Organize packages:
- Entity
- Repository
- Service
- Controller
Create entity classes (e.g., Student, Course, Enquiry)
Connect to the database (MySQL)
Build REST APIs:
- POST → Save data
- GET → Fetch data
- PUT → Update data
- DELETE → Delete data
💡 Tip: Test APIs using Postman before moving forward.
Explore Other Demanding Courses
No courses available for the selected domain.
Step 5: Test Backend APIs
Before proceeding to the frontend, ensure your backend works perfectly.
Check:
- Data is stored correctly
- APIs return expected responses
- No errors occur
⚠️ Skipping this step can lead to major issues later.
Step 6: Build the Frontend
The frontend is what users interact with.
Steps:
- Create an Angular/React project
- Build components:
- Navbar
- Forms
- Dashboard
- Design a user-friendly UI:
- Input fields
- Buttons
- Validations
Examples:
- Enquiry Form
- Admission Form
💡 Focus on a clean and responsive UI.
Step 7: Connect Frontend with Backend
This is a critical step where everything comes together.
Steps:
- Use HTTP client (Angular services or fetch/axios in React)
- Call backend APIs
- Send and receive data
Example Flow:
User submits form → Data sent to backend →
Backend saves data → Response returned →
Frontend shows a success message
💡 Tip: Always handle API errors properly.
Step 8: Add Advanced Features
Enhance your project with additional features to make it more professional.
Examples:
- Search functionality
- Update & delete options
- Dashboard with analytics
- Form validation messages
Step 9: Test the Complete Project
Test your application as a real user would.
Check:
- Forms functionality
- Data storage accuracy
- Update/Delete operations
- UI responsiveness
Step 10: Deploy Your Project
Make your project live so others can access it.
Deployment Options:
- Frontend: Netlify, Vercel
- Backend: Render, Railway
- Database: Cloud-based DB
After deployment, you can share your live project link.
Step 11: Upload to GitHub
GitHub is essential for showcasing your work.
Steps:
- Create a repository
- Push your code
- Add a README file
This helps recruiters understand your project and skills.
Why Full Stack Projects Are Important
- Demonstrate practical knowledge
- Improve interview performance
- Build confidence
- Strengthen your resume
Conclusion
Building a full-stack project may seem challenging at first, but following a structured, step-by-step approach makes it manageable.
Start with a simple idea, plan properly, develop the backend, build the frontend, and finally connect everything together.
Remember, you don’t need perfection on day one—consistent learning and improvement are key.
Final Advice
- Start with one project
- Complete it fully
- Add it to your resume
- Practice explaining it confidently
If you can build and clearly explain your project, you are already ahead of many beginners.
Frequently Asked Questions (FAQs):
1. What is a full-stack project?
A full-stack project is a complete application that includes the frontend (user interface), backend (server-side logic), and database. It allows developers to build and manage an entire system from start to finish.
2. What technologies are required to build a full-stack project?
To build a full-stack project, you need frontend technologies like HTML, CSS, JavaScript (or frameworks like React/Angular), backend technologies like Node.js or Spring Boot, and a database such as MySQL or PostgreSQL.
3. How do I start building a full-stack project from scratch?
Start by selecting a project idea, choosing your tech stack, and planning features. Then build the backend, create APIs, develop the frontend, and finally connect everything together step by step.
4. Do I need to learn both frontend and backend development?
Yes, understanding both frontend and backend is essential for full-stack development. However, you can start with one and gradually learn the other as you progress.
5. How can I make my full-stack project stand out?
You can make your project stand out by solving a real-world problem, adding advanced features like authentication and dashboards, ensuring a clean UI, and deploying it online with proper documentation on GitHub.
Related Links:
Do visit our channel to know more: SevenMentor
Author:-
Aarti Choudhary
Aarti Choudhary
Expert trainer and consultant at SevenMentor with years of industry experience. Passionate about sharing knowledge and empowering the next generation of tech leaders.
Call the Trainer and Book your free demo Class..... Call now!!!
| SevenMentor Pvt Ltd.
© Copyright 2025 | SevenMentor Pvt Ltd.